


March 12, 2020
Two Ways to Sweeten Up Your Recipes With Edible Flowers
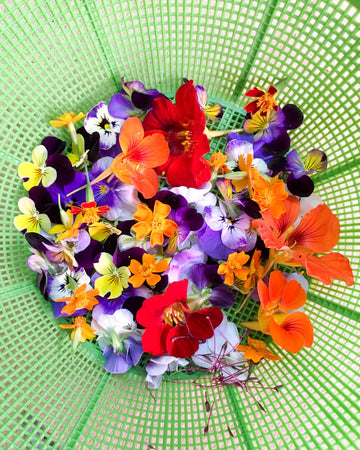
If you've grown your own edible flowers, or bought some from your local farmers, you might be wondering just how to use them. Of course, you can always toss some on a salad to brighten it up, or add some glamour to your home cooked cuisine, but what about some more interesting applications? If you have a sweet tooth, keep reading!
P.S. If you’ve always wanted to figure out how to grow your own edible viola flowers, check out our grow guide!
For more tutorials, recipes, articles, and special offers, sign up for our newsletter!
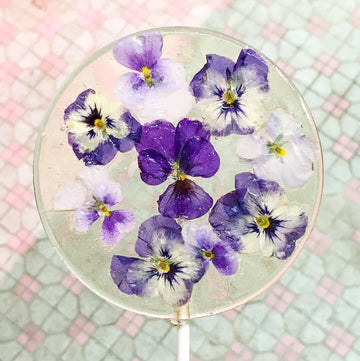
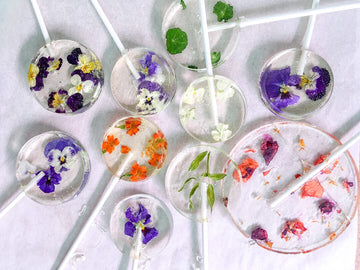
#1: Edible Flower Lollipops
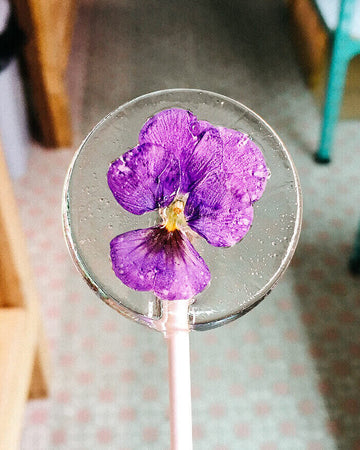
2 Ways to Make Edible Flower Lollipops
Edible flower lollipops are perfect treats to share with friends at parties, bridal showers, wedding receptions, or to enjoy all to yourself! Here are two different ways to make beautiful lollipops with edible flowers.
Method 1: This method involves heating a sugar mixture on a stove top, and pouring the hot liquid candy into molds. This way gives the greatest amount of control over the flavor and appearance of the lollipops, and your friends will be convinced you bought them from the store!
Method 2: Want to avoid dealing with candy thermometers, piping hot candy to pour, and a sticky mess to cleanup? Simply choose clear, hard candy in your favorite flavor, and place them in the oven to melt around the flowers into a perfect lollipop shape.
Stove-top Method: 5 Simple Steps
Supplies
- Lollipop molds
- Lollipop sticks
- Candy thermometer
- Pourable glass container with handle (optional but helpful)
- Clear plastic lollipop wrappers
Ingredients
- 2 cups sugar
- 1 cup water
- 1/2 cup corn syrup
- Edible flowers
Optional
- 1 dram (small bottle) oil based baking flavoring
- Food coloring
Directions
- Spray a light coating of cooking spray onto your lollipop molds to prevent them from sticking.
- In a saucepan, combine the water, sugar, and corn syrup. Turn the heat to medium and stir until the sugar is completely dissolved. Use your candy thermometer (a cooking thermometer will do in a pinch) to monitor the temperature, and wait until the mixture reaches 150C or 300F.
- Remove the pan from the heat, and stir in any flavoring or food coloring very quickly and carefully. You should work quickly and carefully as the candy mixture will harden and become unworkable as it cools. If your saucepan has a good spout, you can use it to pour, otherwise transfer the mixture to a glass pouring container with handle.
- Pour the candy mixture into your mold, then place your selected edible flowers or petal misture on top. Use a toothpick or similar utensil to push the flowers into the mixture. It is better to push the flowers into the mixture instead of placing the flowers into the mold first and pouring the mixture on top, because you will end up with parts of the petals not covered by candy. If you are working with another person, one person can pour the mixture and one can arrange the flowers. The candy cools very quickly and cannot be reheated, so it's imperative to work as quickly and carefully as possible.
- Place a lollipop stick into the mixture and turn it once so that it's coated in candy mixture. Leave the molds to sit until the mixture is completely cool and hard. Twist the mold slightly so that the lollipops are released.
If you are not enjoying them immediately, place them inside a clear plastic lollipop bag and tie with a string, so that they don't become too sticky. Keeping them wrapped and in the refrigerator can help prevent them from melting and becoming too tacky.
Oven Method: 4 Easy Steps
Supplies
- Clear hard candies, flavor of your choice
- Fresh or dried edible flowers
- Silicone lollipop mold
- Lollipop sticks
- Clear plastic lollipop wrappers
Directions
- Preheat your oven to 120C (250F). Place one edible flower, or multiple smaller petals into each cavity of your silicone lollipop mold.
- Place lollipop sticks into each cavity. Then place 1-3 hard candies into each cavity, depending on how much your mold will hold. This may require a trial run for experimentation.
- Put the silicone mold into the oven on a baking sheet, and bake for 30-60 min, depending on how long it takes for the candy to melt completely. Check the progress once and make sure the lollipop sticks are coated in the melted candy; you can gently rotate the sticks to ensure they're completely covered.
- Once the candy is completely melted, remove the molds from the oven and allow the lollipops to cool and harden completely. Gently pop them out of their molds and consume immediately.
*If you are not enjoying them immediately, place them inside a clear plastic lollipop bag and tie with a string, so that they don't become too sticky. Keeping them wrapped and in the refrigerator can help prevent them from melting and becoming too tacky.
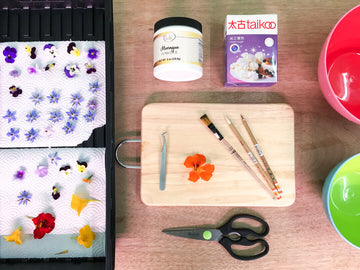
#2 Crystallized Edible Flowers

Candied Flowers
Want to add some natural floral colors to your cakes, cupcakes, or cookies? Social media is loaded with examples of fresh petals gracing everything from wedding cakes to cupcakes, but what if you want real flowers and the sweetness of frosting as well? Try turning fresh flowers into delicate crystallized creations that will add both visual delight and sugary goodness.
Materials
- Freshly picked edible flowers (choose larger petaled varieties like pansies, or marigold, and avoid delicate small flowers like borage)
- Superfine sugar (caster)
- Egg white (you can use powdered egg whites if raw eggs are a concern)
- Artist paintbrush
- Wire rack
Notes
- Carefully store your candied flowers in an airtight container at room temperature for up to two weeks.
- You can store the candied flowers at room temperature for around 2-4 weeks in an airtight container, separated by layers of waxed paper. Do not put them in the fridge, because they'll absorb moisture. If using on wet frosting or dessert, place them at the end so they don't become soggy.
Directions
- Whisk the egg white until bubbles appear, slightly frothy. You can add a couple drops of water if it is too thick, or a couple drops of vodka (flavored or plain) to help the flowers dry faster.
- Dip your paintbrush into the egg white and paint the petals on the front of the flower, then the back.
- Once the flowers are coated completely with egg white, sprinkle fine sugar on both sides until there is a thin, even layer, and place onto the wire rack to dry.
- If the petals are clumped together or wrinkled, you can smooth them out before they dry and become stiff and brittle.
- Leave the flowers on the rack to dry completely, which could take between 4-36 hours.
*Optional drying method if you need it done quickly: Place the candied flowers in an oven set to pilot light overnight. Or, set at 65-90C (150-200F) for a few hours with the door slightly open.
*Important Note on Edibility: Do not eat violas bought in flower shops! They may have been sprayed with toxic pesticides. Only eat leaves and flowers that you've grown yourself. Get in touch if you would like to buy seeds or flowers from us, we NEVER use pesticides. All our products are produced in an indoor, climate-controlled environment and are 100% safe for consumption.
Or, for a fun, fulfilling activity for you or with your kids, try to grow them yourself! Flying in fresh food from far away places harms the environment, reduces nutrition, and is very expensive. Here at Common Farms, we want to eat delicious, healthy food that's good for our planet and our pockets, just like you do, so we built a farm ourselves. Our growing network of indoor, urban farms uses a smart, efficient approach to growing food in Hong Kong so that we can harvest and deliver exceptional produce straight to your door - any day of the year.